Running the Tests
Contents
The RDM Responder tests can be run from the command line or using the Web Interface.
Command Line
Discovering Responders
Run ola_rdm_discover from the command line, you should see the responder’s UID appear:
 $ ola_rdm_discover -u UNIVERSE_NUMBER
 00a1:00010003
 7a70:ffffff00
Running the Tests
The tests are run using rdm_responder_test.py. Below is the output from a typical test run:
 $ rdm_responder_test.py --universe 1  00a1:00010003
 Starting tests, universe 3, UID 00a1:00010003
 SetManufacturerLabel: Passed
 SetSoftwareVersionLabel: Passed
 GetManufacturerLabel: Passed
 GetSoftwareVersionLabelWithData: Failed
 ...
 ------------- Warnings --------------
 ------------ By Category ------------
   Product Information:  7 /  7   100%
       RDM Information:  1 /  1   100%
    Core Functionality:  2 /  2   100%
      Error Conditions: 10 / 16   62%
          DMX512 Setup:  3 /  3   100%
 -------------------------------------
 29 / 30 tests run, 23 passed, 6 failed, 0 broken
Verbose output can be enabled with the -d option. A subset of the tests can be run with the -t option. The following command line will run the SetDeviceLabel and SetStartAddress tests with verbose output.
$ rdm_responder_test.py -u 1 7a70:ffffff00 -d -t SetDeviceLabel,SetStartAddress
Be sure to read the Guide to interpreting the test output for an explanation of the output.
Useful Options
rdm_responder_test.py has some options which can assist in debugging failures. For a full list of options run with --help.
- -d, –debug
- Show all debugging output, including actual & expected responses.
- -l, –log
- Log the output of the tests to a file. The UID and timestamp is appended to the filename
- -t Test1,Test2 , –tests=Test1,Test2
- Only run a subset of the Tests. Only the tests listed (and their dependencies) will be run.
- -w BROADCAST_WRITE_DELAY, –broadcast-write-delay=BROADCAST_WRITE_DELAY
- Some responders take time to write state changes to memory. When using broadcast SETs, the controller doesn’t know how long to wait before sending the next message. This setting adds a delay after (in ms) to wait after sending broadcast set commands.
Web Interface
Procedure
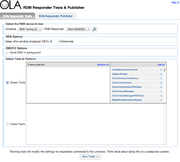
To use the web interface the rdm_test_server.py program must be running. Open a browser and navigate to the host running the test server on port 9099. This will usually be your local machine (http://localhost:9099) or the Raspberry Pi (http://<ip>:9099, replace <ip> with the IP address of the Pi). You will be presented with a screen like the one below.
Select the universe to test from the drop down menu, followed by the RDM responder to test. If required you can run a RDM discovery on the universe by clicking the button with the magnifying glass.
RDM Options
- Delay after broadcast SET
- After sending a broadcast SET, the controller can immediately follow with another RDM command since no response is expected. This causes problems for some devices when they need to write to persistent memory as part of handling the SET command. This option adds a delay between a broadcast SET and the next RDM command. Typical values are 20 – 100ms.
DMX Options
This option enables interleaving RDM frames with DMX frames. You can set the frame rate and the number of slots (channels) to send. Only some of the supported USB devices support simultaneous DMX & RDM.
Tests to Perform
This allows you to select the tests to run. You can either add tests individually or select Add all. After running the one round of tests the list of failed tests will appear in the second box.
Results Page
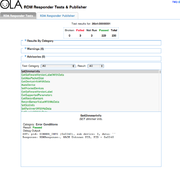
After clicking the Run Tests you’ll be presented with the test results page. Read the Guide to interpreting the test output for an explanation of the logs.
The Results by Category, Warnings and Advisories sections can be expanded to display further information.
Saving the Logs
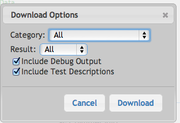
The logs can be saved for offline analysis by selecting the Download Results button on the results page. You can apply category and result filters to the test logs before saving them.


